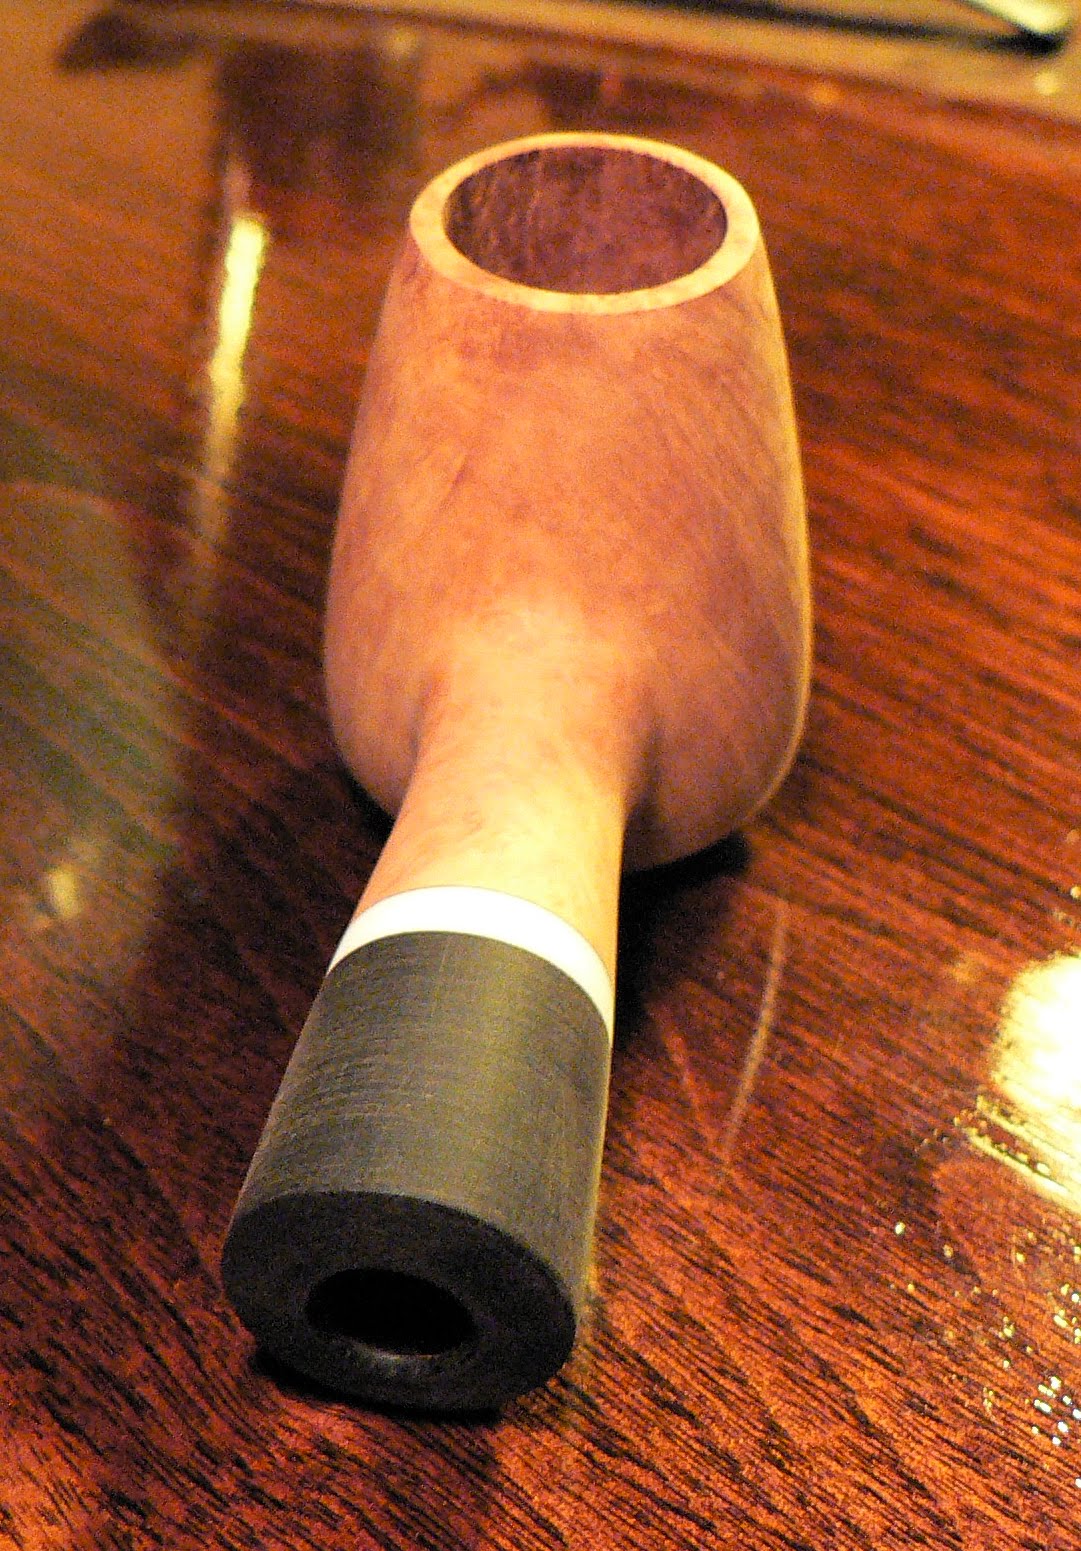
Work on the pipe has slowed a bit. More pipe restoration projects and my ebay have taken the front seat until recently. I was able to get a bit more accomplished toward the end of the week. Final stummel shaping and surface prep were up next. That and some work to the stem.
I was able to get the rim thickness to a point where I was happy and the same for the bottom chamfer on the bowl. These two elements were fairly tricky and I just wasn't happy with them. But with a little patience and dedication I was able to get the result I was seeking.
I then turned my attention to the stem, still a fairly hefty block of ebonite. I took my new belt/disc sander out to my patio, as I didn't want to fill my house with stem dust. I flipped the switch, gave a manly Tool-Time grunt, and roughed in the basic stem shape. After cleaning off the sander, returned inside and did some further shaping, getting my desired military bit/fantail form. I am going to mimic the shape of the shank/extension in the shape of the stem. I am still trying to figure out what insert I will incorporate in the stem. I have a couple ideas, but am still undecided.
I just now completed the ebony stain on the stummel. This is the first step of the 'contrast' approach of finish for the pipe. I have applied the dark stain and will allow it to penetrate, then buff off the residue and unwanted portion. After that I will apply a red stain to the remaining lighter areas of the stummel and in doing so, create a nice contrast. This look will mirror the modeled appearance of the cumberland stem, tying the whole pipe as a congruent unit. I am very happy with the nice grain throughout the pipe; from the flame on the sides to the beautiful birdseye on the bottom. It will look great when the pipe is complete!
I can't wait to get out to Wayne's again to buff and finish the stummel and apply the last coat of carnauba!! But for now, I will continue work on the stem.
Sunday, August 22, 2010
Houten Part V
Posted by Nate King at 9:41 PM Labels: Briar, Ebonite, Pipe Making, Pipe Smoking, Pipes, Stummel 0 comments
Sunday, August 15, 2010
Houten Part IV
I am a stubborn man. I often do things the hard way, and making this pipe, I stand firm to my obstinate ways. If you remember, this particular block of briar has two large flaws in it. As I wrote previously, I was just going to blast/rusticate it and move on. Done deal. Not a chance! I decided to sand through the defects and forge ahead! It brought a change to my pipe shape and size, but I think it will still be a fantastic pipe. I think the new shape is a brandeggcano. However it is classified, I like it!
Today I spent a portion of the day with Wayne in his shop, finalizing the stummel shape. The shank had been paid no real attention until today. Chainsaw and needle files, sand paper rolled up and flat sheet and a pencil to mark the shape. I took the radius of the shank to bowl transition down to a compact arc. I know this is one of the defining points making a hand made pipe excellent or just average. I also know Wayne is a stickler about it and that's why his pipes are some of the best I have seen. I got the thumbs up from him as he took a break from one of his new creations to inspected my work.
Until the next post, happy piping!
Posted by Nate King at 1:22 AM Labels: Briar, McClellands, Pipe Making, Pipe Smoking, Pipes, Stummel 0 comments
Wednesday, August 04, 2010
Houten Part III
Spent the day in record heat (or close to it) today. The factor that makes it excruciating for me is the nasty humidity! Oh well, I lived. Right now we have some fairly ominous thunderstorms rolling through. Definitely love those! Well, as long as they don't take out the power.
Arrived at work this morning and my pipe was waiting attentively for me. Okay, well, it was setting right where I left it the evening before. I didn't get too much time to shape it today, but did accomplish some valuable work. I am finally gaining on the bowl and stem shape I imagined for the pipe. The shank will vary slightly from my original drawing, but I believe it will be an improvement. I am still working on my stem shape, as I am not happy with any rendering yet. It will come to me.
Oh! One really fantastic thing happened at work today! I received my Mario Grandi from Italy! Nice looking poker I had won on ebay from Futurepipes1. Will be giving it a good run in the next few days :)
For right now, I am working on pipe restorations for a couple guys and my ebay pipes for this weekend. Smoking Peter Stokkebye's Luxury Bullseye Flake in my first pipe, Czeque.
Posted by Nate King at 10:35 PM Labels: Briar, Cumberland, Ebonite, Pipe Making, Pipe Smoking, Pipes 0 comments
Saturday, July 31, 2010
Houten Part II
Another Saturday spent with Wayne in the shop. Work progressed well and I am getting closer to completion, but wait, what happened this week to get me to this point? I will tell you tales of tragedy and triumph.
The still squared off hunk of briar went with me to my workplace to be fiddled with on breaks and lunches. Using a small disc sander with 180 grit paper, I roughed in the pipe shape I had drawn on the stummel. Only having minutes at a time, the shaping progressed very slowly, but progressed nonetheless. Such beautiful grain revealing itself as I work with this wonderful piece of briar! Every pass on the disc brought me closer to a first class, top notch pipe, or so I thought.
Thursday rolled around and I had planned on having a close to final brandy shape on the stummel. Wayne has written me earlier in the week to keep me from gluing the extension into the briar as we had planned because I still had to drill the mortise to receive the stem tenon. So I rounded the white acrylic portion and set it aside until I could drill it. Afternoon break rolled around and I began to remove more briar from the stummel hoping to get the main shape done before the end break. Dust was floating about, piling up on the bench and the pipe was finally taking shape, but, what's this?! As I sanded down the left side of the bowl, a (large) defect began to appear! Nooo!!!! Such a beautiful block to have this huge flaw! I hoped to sand a little more and have the flaw disappear, but this would not be the case. The more I removed the larger the fissure. So I stopped for the rest of the week, until I could show Wayne and get his input.
So, this morning I ventured to Wayne's and showed him the flaw. He reminded me the possibility of defects is pretty common when dealing with briar and he has had to deal with it himself. As has every other pipe maker. So I thought to myself I have joined the ranks, but in order to be a good maker, I have to salvage what I can and still make a great pipe. We discussed ways to work around the flaw, as with even more sanding, the defect made itself clear it is going nowhere. Bouncing ideas back and forth, I decided to try a rustication (and possible additional sandblast) finish most similar to a pair of Svendborg pipes I own.
I had originally decided to use a colored stem of some sort, to be a bright accent to the dark finish and black and white extension I had implemented. My ideas now shifted slightly with utilizing a rusticated/blasted technique, I will use a less bright, but still colorful cumberland stem. To highlight the cumberland stem, I thought it would be nice to use a dark black or bright reddish finish on the stummel. Another brainstorming session with Wayne helped me decide an orangey base stain (the same orange color found in the stem) and then covering that with an ebony. Then the ebony will be removed on the high points of the rustication to allow the orange to show through, mirroring the effect of the cumberland. Genius!
I drilled the extension and glued it to the stummel to be shaped later. I finished what I could of the secondary bowl sanding and will shape the shank and extension after the extension glue has cured. I was also able to drill the cumberland rod stock and turn a tenon to fit the extension mortise. I am quite happy with what was accomplished today.
Having not stopped last Saturday to have a smoke, we began the day with a pleasant one! I think that is what really facilitated our progress today! Wayne worked on a couple pipes, a nice billiard with great bands on the shank and a bent egg shape. I can't wait to see both of them in their finished state! Until next pipe....
Posted by Nate King at 10:33 PM Labels: Briar, Ebonite, Pipe Making, Pipe Smoking, Pipes, Stummel 0 comments
Monday, July 26, 2010
Houten
I have begun work on my first pipe, made completely by myself. No drilled blocks. No preformed stems. A chunk of raw cut briar. Some ebonite rod. A piece of acrylic. From raw form to finished polish, I will be making this one from start to finish.
I got up late Saturday morning (7/24) and headed for Wayne's house to begin work on my next pipe. Fought oddly insane traffic for a Saturday morning, but made decent time and was only a half hour late. The Wayne I speak of is Wayne Teipen who has made quite a few fantastic artisan pipes. He has opened up his shop and knowledge to me and I jumped at the opportunity! I am blessed to live so close to a pipe-maker who is willing to assist me as I begin this journey into the art.
Beginning with the draft hole, I lined up the block in the machine vise and drilled, having already faced of the block to give myself a flat surface with which to start the hole. Slow and steady, running the drill down to the depth mark I had made. First cut done, on to the next, the extension tenon hole. More lining up and placement, then brad point bit cutting through the briar. Now the chamber hole. Reset the block and faced it using the same forstner bit from the draft hole. Change out the forstner for a 3/4" spoon bit and here we go! Augered out the briar, keeping the bit cool with compressed air which also removes the briar chips so you can visually check your progress. Near the breakthrough point where the draft hole meets the chamber hole, the compressed air is applied to the draft hole. When the auger breaks though, the air will be allowed to pass through from the draft hole which blows out the debris. This is done to avoid drilling the chamber hole too deep, which can make for a poor smoking experience. All drilling done, I had just missed the centerlines of the chamber and draft holes slightly, but nothing too horrible. All-in-all, I am pleased with my first attempt at briar drilling!
A great day's work complete, I was pretty pleased with the progress. I can't wait to get back in the shop and do more!
Posted by Nate King at 2:09 AM Labels: Briar, Cumberland, Ebonite, Pipe Making, Pipe Smoking, Pipes 0 comments
Saturday, July 03, 2010
One Czeque That Won't Bounce
I decided a while back to make my own pipe. Just short of doing the whole thing myself, I bought a pre-drilled/stemmed carve your own block from my local pipe shop, The Pipe Puffer in Greenwood, IN. The block was in pretty rough shape having a square shank and bowl. Of course I started work, forgetting to take a 'before' picture. The poor drilling of the stummel made final sanding difficult as none of the holes were true to, well, anything! I had been speaking with a full fledged pipe maker, Wayne Teipen, during the whole process, bouncing ideas off of him. He was most helpful throughout the process of design.
The block took its first cut on a smaller disc sander, a Delta 6" setup with 120 grit paper. As I roughed in the top of the bowl, the pipe began to direct its shape. Starting as a general looking 'poker' style pipe with the shank still remaining square, I flattened both top and bottom in parallel. To leave the fore and aft bowl faces unparalleled seemed to give the pipe an interesting look. I partly borrowed the idea from a Danish inspired bent 'brandy' shape I had recently seen. At this point I roughed in the shank the best I could with the disc. The rest of this part would be done with my Dremel at home.
I asked Wayne to help with the finish and he told me to take a trip out to his shop. We put the finishing touches on my pipe there and enjoyed a smoke together. He showed me the finer points of 'contrast' staining, starting with a very dark base stain, applying it 3 times. After the base application, over to the red tripoli buffing wheel to remove the dark stain and obtain the desired level of coverage. I left the blasted sections darker than the smooth surfaces to accentuate the unique blast. Completing this step, we went back to the stain selection and I picked and orangey-red color for the surface stain. This took only two applications, then back to the buffing wheel. This time the white diamond wheel which only polishes and does not remove any finish. The gloss had begun to shine now and the detailing touches were applied to the stain before giving the pipe a high gloss with the carnauba wax wheel. The stummel looked fantastic! The only part left was the stem.
*Edit 07/04/2010* Wanted to add, I smoked the pipe for the first time today with Peter Stokkebye's Luxury Bullseye Flake, and it was great! Nice draw and cool smoke, had one small gurgle mid-bowl, but it went away with a little reverse puff. Turned out to be a great smoker!
Czeque
- Style: Mod. Poker/Tankard
- Material: Briar
- Stem: Vulcanite
- Finish: Smooth/Partial blast
- Group Size: 4
- Length: 5 5/8"
- Height: 1 9/16"
- Bowl Dia.: 1 3/8"
- Chamber Dia.: 13/16"
- Chamber Depth: 1 1/8"
- Weight: 40g
Posted by Nate King at 10:51 PM 0 comments
Sunday, February 07, 2010
Briar Buffer
Having written about pipes, I will show a before and after of a pipe I have 'restored'. Typical for most pipes, I will ream the excess cake from the chamber and clean the draft hole. The top of the bowl will have any buildup removed. I restore the stem by removing all the brown or green oxidization and restore it to the original black vulcanite color. I then polish the stem being careful to not round any crisp edges or harm any insignias that may be on it. I clean the stummel (the main body of the pipe existing of the bowl and shank) and polish it and give it a good waxing. For my own pipes and if requested, I will run a 'sweetener' through the pipe.
Posted by Nate King at 4:40 PM Labels: http://1.bp.blogspot.com/_kAWkVDnh5hA/S67rRFfIEvI/AAAAAAAAN94/TWHMX0sOtgI/s320/P1100395.JPG 2 comments
Monday, January 25, 2010
Pipe Cleaners
It has been a long time since my last post. A lot of water, a lot of bridges. Moving along...
Posted by Nate King at 11:12 PM Labels: new experiences, Pipes 0 comments
Tuesday, January 20, 2009
Vintage
I recently acquired my grandparents' 1965 Zenith record player. A fine example of 60's style with dark wood grain and flashy chrome. The mechanism required some attention and the needle was practically destroyed. Over the past couple of months I have replaced the cartridge and needle and adjusted the tonearm tension to get it to play correctly. The tension may still need to be tweaked a little, but it is now in nominal working condition. I have the benefit of having 4 play speeds: 16, 33, 45 and 78. It is not only great to hear the most popular 33 1/3 RPM vinyls records, but also the older, thicker shellac 78's.
Posted by Nate King at 11:04 PM 1 comments
Tuesday, December 23, 2008
Extra Credit...
One semester of college under my belt. I took Art Appreciation and CAD Fundamentals this semester and received "A's" in both courses. The work took some getting used to, and the nights of working until at least 1 AM seemed perpetual. Although some assignments were difficult I got into a work rhythm and they proved to be quite rewarding. The work paid off and I have a 4.0 GPA for the time being. I know these were fairly easy courses and work will be more difficult as I move forward, but I am reveling in my success!
I wrote my first research paper on the Prairie School of Frank Lloyd Wright's architectural design career. I had a great editor to help me and got 38 of 33 points available. I took a trip to Chicago with Neil to gain information about Frank Lloyd Wright and his design. I was able to include my own images in my paper which gave me extra credit. The overall available score for the course was 111 and with extra credit I was able to get a score of 135.6. I received a nice note from my Art professor following the course:
"Nathan,You are the Man!! No worries Mate!! You definitely aced an A. I wish all my students were as prolific, proactive, and throw themselves into their work has you did. I have to say, out of all my ARTH classes (I taught two this semester, over 50 students) you scored the highest of all, and accumulated extra credit on top. I enjoyed your research paper, and your discussion units. Are you a research analyst as your 40/wk job? Do you write books for living? If not, you might look into this! Nathan, I truly enjoyed you as a student, and wish you all the best as you pursue more college classes, and other adventures you take on. You will do well, I can tell..." Steve Lambert
Very encouraging to hear! I am in the process of signing up for Advanced CAD as instructed by my professor, but the system they have indicates I need to take the Technical Graphics course prior. Because I am not seeking their degree for this, I am going to speak with the Chairperson of the Technical Department to see if I can waive this particular course.
I am looking forward to furthering my education and attempting to gain a position at an architectural firm as soon as I am able. Current economy has hampered that goal for the moment.
Posted by Nate King at 8:06 PM 0 comments
Saturday, November 01, 2008
Undergrad
Having taken my first mid-term tests last week, I have completed half a semester of my first experience with college. Both midterms went very well, I got 39 of 40 questions correct in my AutoCAD class and I aced my Art History exam. I am pleased with my grades so far but have a couple more tests and my first 'college level' research paper to complete for my art class. I have selected 'Frank Lloyd Wright, and the Prairie School' as my subject. This is fitting to my desire to seek a degree in architecture. I am a bit apprehensive of composing a research paper, but I am certain, in the end, I will do well.
I spent a few hours today at the Crown Hill Cemetery to study a couple of books I have checked out of the downtown public library. I have found the area surrounding James Whitcomb Riley's memorial to be a serene place to read and think. Today proved to be somewhat less tranquil as the memorial saw quite a bit of traffic. Nonetheless, I was able to get some study done and enjoy the unseasonably warm day.
Posted by Nate King at 6:03 PM Labels: Art, AutoCAD, College 0 comments
Sunday, July 20, 2008
Showing some leg...
Another great weekend of culinary endeavors!
Posted by Nate King at 11:04 PM Labels: Cooking, Food, Friends 0 comments
Sunday, July 06, 2008
Yes Chef!
A friend of mine, Joel, and I have been enjoying the great television programming on Monday and Tuesday nights. 'American Gladiators', 'Wipeout', and 'I Survived A Japanese Gameshow' to name a few. But, being 'foodies', we are drawn most to the reality cooking show 'Hell's Kitchen' hosted by Gordon Ramsay. It has been one of Joel's interests to cook Chef Ramsay's cookbook in its entirety. So I decided to help him in his first venture. I may have promise as a 'sous chef'!

Posted by Nate King at 12:40 AM Labels: Cooking, Food, Friends 1 comments